Installing Juju
Create a VM for the Juju controller
In order to enable MAAS to manage the KVM machine, you will need to install the
libvirtd package on the MAAS Rack controller:
$ apt install libvirtd
If you have yet a VM in Ready status you can use it as Juju controller instance,
otherwise you can add a new machine, following the instructions below.
Add a new VM
Login to the MAAS web UI with your admin credentials and navigate to the Nodes tab.
Click the Add Node button and fill the form (MAC address value also) and finally click Save machine button:
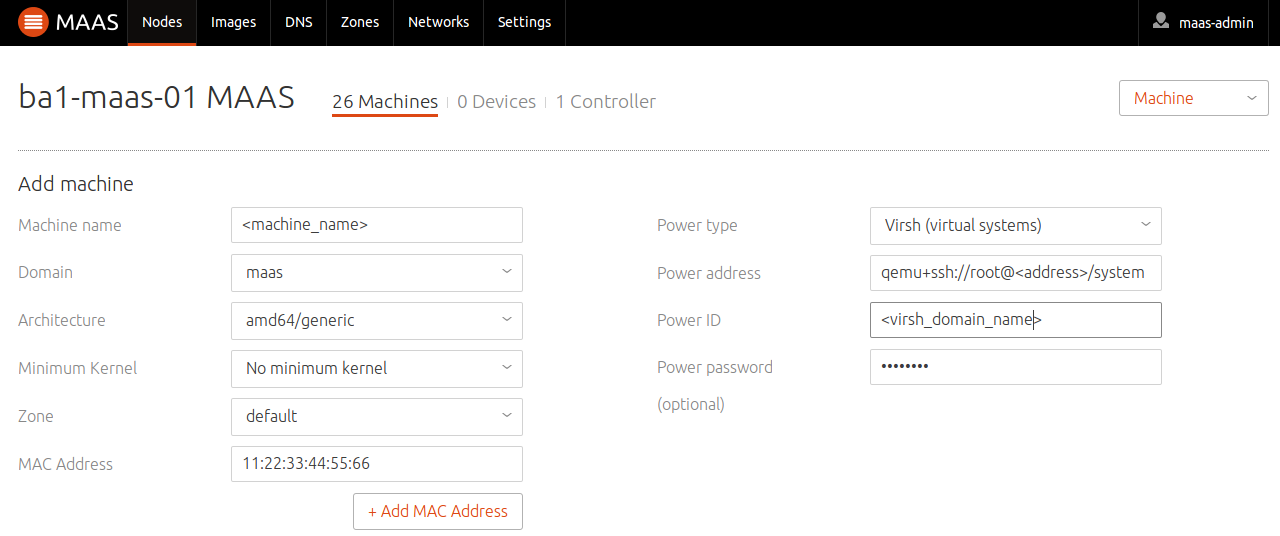
Add a VM
Notes:
Machine nameis the name of the machine as seen by MAASPower IDis the domain name of the VM installed on libvirtPower passwordis the password to connect to the libvirt environment
If you need to get the MAC address of the VM, you can do so through the following commands:
$ virsh list
$ virsh dumpxml <VM id>
Now your VM Jujucontroller is present in the list nodes of MAAS and with Ready status.
Select it, click the Take Action button and choose the Commission action.
Install the Juju client
Install the Juju client needed to deploy Juju controllers on your VM. Note: the Juju client can be installed in the same container where MAAS is installed or in another container/server.
Issue the following commands to install Juju:
$ add-apt-repository -yu ppa:juju/stable
$ apt update
$ apt install juju
Add MAAS as supported cloud
To list the supported clouds use the command:
$ juju list-clouds
By default, MAAS is not present in the supported list of clouds and you need to add it.
Add the MAAS cloud by creating a yaml file called for example maas-cloud.yaml with the following content:
$ cat maas-cloud.yaml
clouds:
  <your cloud name>:
    type: maas
    auth-types: [oauth1]
    regions:
      <your Region name>:
        endpoint: http://<your MAAS address>:<your MAAS port>/MAAS/
For example:
clouds:
  mymaas:
    type: maas
    auth-types: [oauth1]
    regions:
      myregion:
        endpoint: http://<maas-ip-address>:<maas-port>/MAAS/
Then issue the following command to add your new cloud:
$ juju add-cloud <your cloud name> maas-cloud.yaml
Please note that <your cloud name> should match the name in the YAML, e.g. mymaas.
Create credentials for Juju on MAAS
In order to authenticate Juju on the MAAS server, you need to create a credential file
juju-credential.yaml with this content:
$ cat juju-credential.yaml
credentials:
  <your cloud name>:
       <your username>:
            auth-type: oauth1
                maas-oauth: <_MAAS_API_string>
For example:
credentials:
  mymaas:
    maas-admin:
        auth-type: oauth1
        maas-oauth: y9bNe...
Add other credentials (corresponding to different MAAS users) to juju-credential.yaml, if needed.
To get the MAAS_API_string login on the MAAS web UI, selecting the Account option
from the user menu in the top right corner,
opening the user preferences page and scroll down to the API Key section.
You can generate an API key for the currently user as needed.
(The API key is currently used to login to the API from the command line.)
While you are still on the MAAS preferences page, add your SSH key by clicking Add SSH key.
Use the public half of your SSH key, the content of:
~/.ssh/id_rsa.pub
Warning: do not paste your private key!*
Now, run the following command to add your new credential for Juju:
$ juju add-credential <your cloud name> -f juju-credential.yaml
Bootstrap the Juju controller
Execute the bootstrap step to deploy a Juju controller node:
$ juju bootstrap <your cloud name> <controller-name> --to <target>
where <target> is the MAAS name of the VM created in the previous stem, for example:
$ juju bootstrap mymaas myJujuctrl --to Juju-controller
After launching the command, it should be necessary to turn the host on manually. Once the controller installation is completed, add your favorite SSH keys:
$ juju add-ssh-key "$(cat ~/.ssh/<id your pubkey>.pub)
Model configuration
Now is possible to configure the environment in Juju. See also [Models config](https://Jujucharms.com/docs/2.0/models-config) The command to run model model configuration is:
$ juju model-config
Add models and users to the Juju controller
It is recommended to create new Juju models and users in order to isolate different environments, e.g. a production environment from a develoement/testing one.
Create new users in MAAS (in this example they are called
maasprodandmaastest, take note of the API-KEY, add the credentials to Juju-credential.yaml as described above.Load the credentials on the Juju controller:
juju add-credential -f Juju-credential.yaml --replace mymaas
Note the
--replaceoptions which is compulsory if the credentials have already been loaded.Create the Juju models, e.g.
JujuprodandJujutest, and associate them to the maas users created above:juju add-model Jujuprod --credential maasprod mymaas juju add-model Jujutest --credential maastest mymaas
Create the linux users that will log in to the corresponding Juju model, e.g.
userprodandusertestCreate users in the Juju controller, e.g.
userprodandusertest:juju add-user userprod User "userprod" added Please send this command to userprod: juju register ...key... juju add-user usertest User "usertest" added Please send this command to usertest: juju register ...key...
Login as the linux users created above and issue the
Juju registercommand given above.Grant to the Juju users the
adminorreadprivileges to the corresponding model, e.g.:juju grant usertest admin Jujutest juju grant usertest read Jujuprod
As linux user switch to the corresponding model:
juju list-models
Controller: Juju-controller

Model               Owner  Status   Access  Last connection
admin/Jujuprod  admin  available  admin   2 minutes ago
admin/Jujutest  admin  available  read      never connected

juju switch admin/Jujuprod

juju-controller (controller) -> Juju-controller:admin/Jujuprod
Add the SSH keys to the models:
juju add-ssh-key -m Jujuprod "$(cat ~/.ssh/id_rsa.pub)"
To avoid to type the password of the SSH key, at every login issue the following commands:
ssh-agent bash
ssh-add ~/.ssh/id_rsa