Tutorial: Develop (and deploy) a Reactive Juju Charm
Terminology
For the terminology used in this tutorial please refer to the official documentation.
Goal
Show how to develop a Juju Charm based on the Wordpress CMS using the Reactive framework.
The Wordpress charm will be developed iteratively, then deployed, configured and put in relation to the mysql charm.
Although this tutorial is focused on Wordpress, the basic concepts can be applied to the development of other charms supporting different applications. The specific behaviour of the charm will of course depend on the specific application.
Compared to the Charm development Tutorial we here use a well known application (Wordpress) as a working example.
Language and pattern used
The Wordpress charm will be created and configured using the reactive paradigm and, specifically, using the reactive.charms Python library.
Prepare the development environment
If you don’t have already a Juju environment ready, you can easily create an LXD based Juju environment (in your computer or inside a VM) by following the Using LXD with Juju guide.
In order to make writing Juju Charms easier, install Juju Charm Tools:
sudo snap install charm --classic
Create The Wordpress Charm Skeleton
Using the charm tools, we create the directory structure we need for our charm quickly and easily:
charm create wordpress
This not only creates the directory structure, it also populates it with template files for you to edit.
Wordpress Charm Development Tutorial
Find the wordpress directory just created and edit the
metadata.yamlfile located in it:name: wordpress summary: The wordpress CMS maintainer: GARR CSD <cloud-supporta@garr.it> description: | The wordpress CMS tags: - cms subordinate: false series: [trusty] provides: website: interface: http requires: database: interface: mysql
The
metadata.yamlis the file that Juju reads to find out what a charm is, what it does and what it needs to do it.The
summary,maintaineranddescriptionfields can be edited with arbitrary descriptions.The
providesandrequiresfields define which relations are actually provided or required by the wordpress application.Since the Wordpress charm is a web-based application, it provides a simple HTTP interface.
Also, the Wordpress charm needs a connection to a database to function properly, so in
metadata.yamlwe require a mysql interface.Edit the
layer.yamlfile in the wordpress directory and include thebasicandaptlayers:includes: ['layer:basic', 'layer:apt']
Depending on the charm you are building, you can add other layers, but tipically the
basiclayer is required by every charm, while theaptlayer can be very useful for charms based on packaged applications.These two layers provide the
charm.reactive,charm-helpers,charm.aptlibraries and all of their dependencies for use by the charm.Edit the
wordpress.pyfile in thewordpress/reactivedirectory:from charms.reactive import when, when_not, set_flag from charmhelpers.core.hookenv import status_set import charms.apt @when_not('apt.installed.wordpress') def install_wordpress_apt(): charms.apt.queue_install(['wordpress']) #sets the 'apt.installed.wordpress' flag when done @when('apt.installed.wordpress') @when_not('wordpress.ready') def install_wordpress(): # Do your setup here. # # If your charm has other dependencies before it can install, # add those as @when() clauses above., or as additional @when() # decorated handlers below # # See the following for information about reactive charms: # # * https://jujucharms.com/docs/devel/developer-getting-started # * https://github.com/juju-solutions/layer-basic#overview # status_set('blocked', "wordpress installed, waiting for database") set_flag('wordpress.ready') @when_not('wordpress.ready') @when_not('apt.installed.wordpress') def waiting_for_wordpress(): status_set('maintenance', "waiting for apt wordpress installation")
Please note the use of Python decorators to “react” to conditions, represented by “flags”. Flags can be set implicitly (as done by the
charms.apt.queue_install(['wordpress'])line) or explicitly (as done by theset_flag('wordpress.ready')line).Please refer also to the charms.reactive Documentation
Be sure to be logged into a juju controller.
For more informations: how to log in to a controller
Position yourself in the wordpress directory and from the command line execute these commands:
charm build
juju deploy /tmp/charm-builds/wordpress
watch -c juju status --color
As you can see, Juju will do the following:
Interact with your cloud to request the provisioning of a machine on which to deploy the charm
Deploy your wordpress charm
The wordpress application and unit will halt on the status
blockedbecause no other Python function was specified to be executed in thewordpress.pyfile after theinstall_wordpressfunction.Also, the application status
blockedis exactly what we expect to see since we wrote the following instruction inwordpress.py:status_set('blocked', "wordpress installed, waiting for database")
At this point, a charm that will install wordpress via apt and do nothing else has been created and deployed.
Continue the charm development, deploy mysql and add a relation between wordpress and mysql:
Add a new function in the
wordpress.pyfile:@hook('database-relation-joined') def database_is_ready(): status_set('blocked', 'Database is ready (joined) but not configured') set_flag('wordpress.database_is_ready')
This function uses the
@hookdecorator, which associates the decorated function to a Charm Lifecycle event.Add also the missing imports:
from charms.reactive import when, when_not, set_flag, hook
Position yourself in the wordpress directory and from the command line execute these commands:
charm build
juju upgrade-charm wordpress --path /tmp/charm-builds/wordpress
juju deploy mysql --series xenial
juju add-relation wordpress mysql
watch -c juju status --color
As a result of these commands, the mysql charm will be deployed.
A relation between mysql and wordpress will be added.
The wordpress application and unit will halt again on the status
blockedas we expect, since we wrote thestatus_setinstruction in thedatabase_is_readyfunction.The
database_is_readyfunction is executed when both wordpress and mysql units are deployed.Also, the function execution is triggered when the relation between wordpress and mysql is added as a result of the
juju add-relationcommand previously issued.
Wordpress Specific Code
Configure the Wordpress application according to https://help.ubuntu.com/lts/serverguide/wordpress.html
Edit the
install_wordpressfunction in thewordpress.pyfile:def install_wordpress(): # Do your setup here. # # If your charm has other dependencies before it can install, # add those as @when() clauses above., or as additional @when() # decorated handlers below # # See the following for information about reactive charms: # # * https://jujucharms.com/docs/devel/developer-getting-started # * https://github.com/juju-solutions/layer-basic#overview # status_set('maintenance', "configuring wordpress") # see https://help.ubuntu.com/lts/serverguide/wordpress.html wpconf = """ Alias /blog /usr/share/wordpress <Directory /usr/share/wordpress> Options FollowSymLinks AllowOverride Limit Options FileInfo DirectoryIndex index.php Order allow,deny Allow from all </Directory> <Directory /usr/share/wordpress/wp-content> Options FollowSymLinks Order allow,deny Allow from all </Directory> """ write_file('/etc/apache2/sites-available/wordpress.conf', wpconf) subprocess.call(['a2ensite', 'wordpress']) service_restart('apache2') status_set('blocked', "wordpress installed, waiting for database") set_flag('wordpress.ready')
The modified function does the following:
writes into
etc/apache2/sites-available/wordpress.confexecutes the
sudo a2ensite wordpresscommandrestarts the Apache service
Create a directory named
templatesinto the wordpress directoryIn
templates/create and edit a file namedconfig-localhost-php.tmpl:<?php define('DB_NAME', '{{ my_database.database }}'); define('DB_USER', '{{ my_database.user }}'); define('DB_PASSWORD', '{{ my_database.password }}'); define('DB_HOST', '{{ my_database.host }}'); define('WP_CONTENT_DIR', '/usr/share/wordpress/wp-content'); ?>
Write the following function in
wordpress.py:@when_all('wordpress.ready', 'wordpress.database_is_ready') def config_php(): status_set('maintenance', 'configuring wordpress') mysql = relation_get() log(str(mysql),'INFO') render( source='config-localhost-php.tmpl', target='/etc/wordpress/config-default.php', context={ 'my_database': mysql }) open_port(80, protocol='TCP') status_set('active', 'Ready')
This function retrieves information from the mysql unit regarding the account and database that was created when the
juju add-relation mysql wordpresscommand was executed.Then, writes these information into the
/etc/wordpress/config-default.phpfile using the Jinja2 templating engine.Add the missing imports:
from charms.reactive import when, when_not, set_flag, hook, when_all
from charmhelpers.core.hookenv import status_set, relation_get, log, open_port
from charmhelpers.core.host import write_file, service_restart
from charmhelpers.core.templating import render
import charms.apt
import subprocess
Build and deploy the wordpress charm with the last modifications:
charm build
juju upgrade-charm wordpress --path /tmp/charm-builds/wordpress
watch -c juju status --color
The wordpress application and unit status will become Ready.
The wordpress charm is correctly configured and ready to be used.
Expose Wordpress
From the command line execute this command:
juju expose wordpress
Use Wordpress
From the command line execute the juju status command:
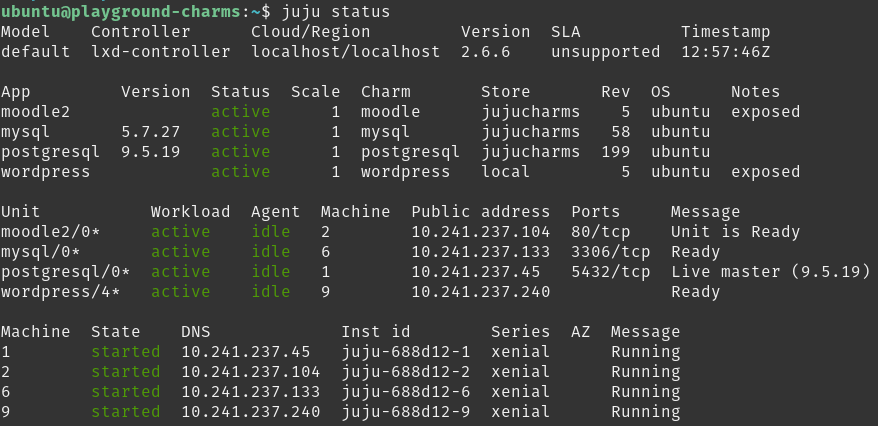
You can notice that the wordpress application is publicly exposed.
Take the public address of the wordpress unit, open a browser and enter the address into the address bar (please note that you may need to add /blog to the URL).
Enjoy Wordpress!